Quantcast
Channel: DevExpress CodeRush Tips and Tricks » Installation

How to install the IDE tools (CodeRush and/or Refactor!)

$
0
0

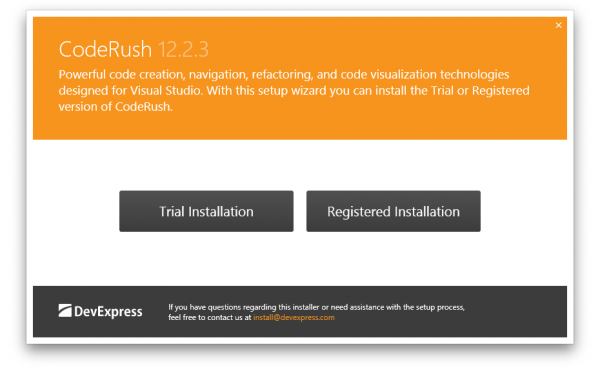
Once you download an installer from the DevExpress website, run it, and follow the instructions on the screen:

DevExpress CodeRush Installation 1

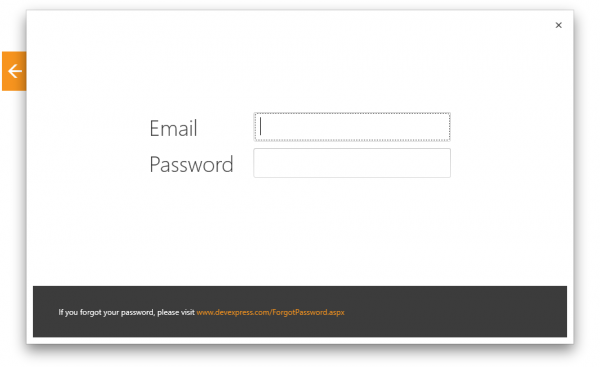
If you’re a registered user, choose the Registered Installation option, and enter your details on the next screen:

DevExpress CodeRush Installation 2

If you don’t have a license, you may install the product in the trial mode that lasts for 30 days. The functionality of the standard products, when installed in trial mode, is not reduced during this period.

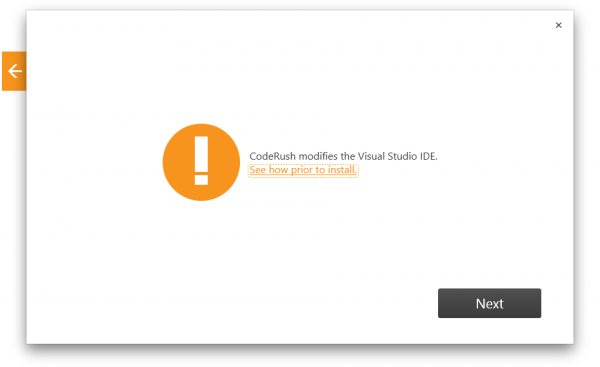
On the next screen, you will be notified that CodeRush modifies the Visual Studio IDE:

DevExpress CodeRush Installation 2

I recommend you click the “See how prior to install” link to learn more.

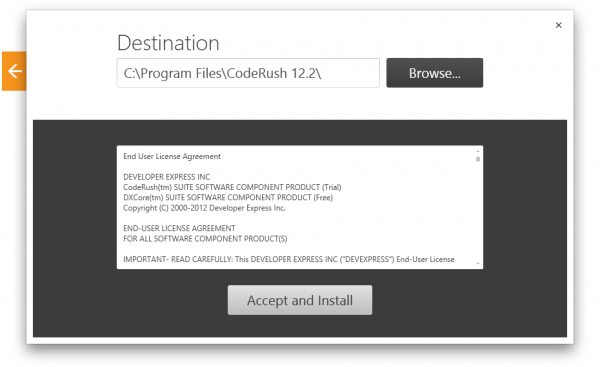
Select the destination installation folder and accept the terms of the End User License Agreement, if you’re agree with them:

DevExpress CodeRush Installation 4

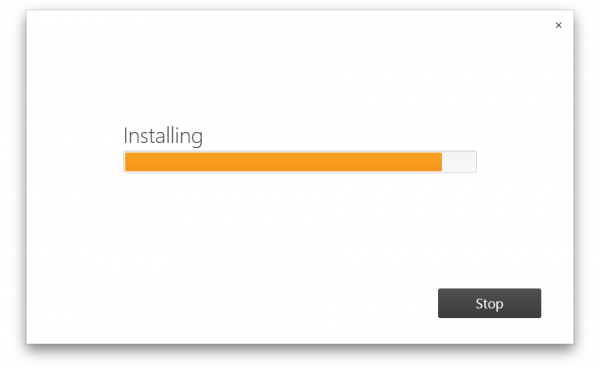
Installation progress is shown on the next screen. It may take up to several minutes to install, depending on the Visual Studio versions you have installed:

DevExpress CodeRush Installation 5

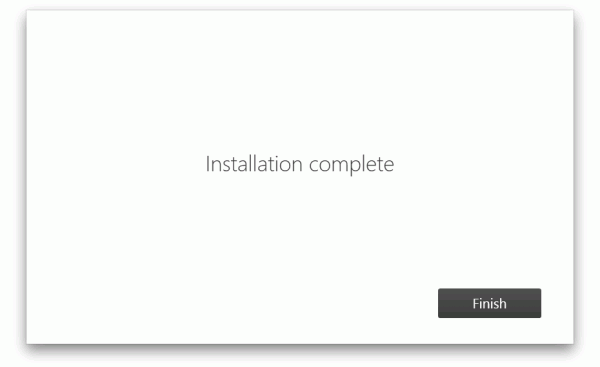
After the installation process is complete, click on the Finish button, and you’re done:

DevExpress CodeRush Installation 6

If you have questions regarding this installer or need assistance with the installation process, feel free to contact DevExpress by writing to: install@devexpress.com or support@devexpress.com.

—–
Products: all
Versions: 12.1 and up
VS IDEs: 2008 and up
Updated: Nov/29/2012
ID: T014

Similar Posts:


How to completely uninstall IDE tools (CodeRush and/or Refactor!)

$
0
0

Note, this article has been moved to the official DevExpress Support Center site. Please refer to the moved article as it might have further updates or additional comments. Thank you.

Here are the steps required to clean-up your system from CodeRush installation:

1. Uninstall the products (DevExpress CodeRush) from the Control Panel.

2. Search for any remaining DevExpress.CodeRush~, DevExpress.DXCore~ or DevExpress.Refactor~ assemblies located on your hard drive, including your GAC (%WindowsRoot%\Assembly), and delete any if found.

3. Backup your user settings located in the “%appdata%\CodeRush for VS .NET\1.1” folder and remove it.

4. Delete the Registry keys that were added when installing the product. Please note, the keys to be removed differ for 64-bit and 32-bit OS versions. Here are the keys you should remove:

For 32-bit OS

HKEY_CLASSES_ROOT\Installer\Products\1B5C4D2C5C682AC4B90028FD5D8DFB62
HKEY_CLASSES_ROOT\Installer\UpgradeCodes\781A3E6ADAAEC45469EF271B371F91AF
HKEY_LOCAL_MACHINE\SOFTWARE\Developer Express\CodeRush for VS
HKEY_CURRENT_USER\SOFTWARE\Developer Express\CodeRush for VS
HKEY_CLASSES_ROOT\CLSID\{7EB58660-96F1-49CF-B8AF-F47152B8CE29}
HKEY_LOCAL_MACHINE\SOFTWARE\Microsoft\VisualStudio\{VSVersion}\AddIns\CodeRush
HKEY_LOCAL_MACHINE\SOFTWARE\Software\Microsoft\Visual Studio\{VSVersion}\Addins\CodeRush
HKEY_CURRENT_USER\SOFTWARE\Software\Microsoft\Visual Studio\{VSVersion}\Addins\CodeRush
HKEY_LOCAL_MACHINE\SOFTWARE\Microsoft\VisualStudio\{VSVersion}\Packages\{13041012-50AF-4d13-A1E1-4978B21E49CD}
HKEY_LOCAL_MACHINE\SOFTWARE\Microsoft\VisualStudio\{VSVersion}\Packages\{BD359A86-BF88-4c4e-A7D2-6CDDA36C3B79}
HKEY_LOCAL_MACHINE\SOFTWARE\Microsoft\VisualStudio\{VSVersion}\Packages\{02BD4ECB-C032-4ced-B3C1-51AD29309225}
HKEY_LOCAL_MACHINE\SOFTWARE\Microsoft\VisualStudio\{VSVersion}\InstalledProducts\DXCore
HKEY_LOCAL_MACHINE\SOFTWARE\Microsoft\VisualStudio\{VSVersion}\InstalledProducts\Refactor!
HKEY_CLASSES_ROOT\Installer\UpgradeCodes\781A3E6ADAAEC45469EF271B371F91AF

For 64-bit OS

HKEY_CLASSES_ROOT\Installer\Products\1B5C4D2C5C682AC4B90028FD5D8DFB62
HKEY_CLASSES_ROOT\Installer\UpgradeCodes\781A3E6ADAAEC45469EF271B371F91AF
HKEY_LOCAL_MACHINE\SOFTWARE\Wow6432Node\Developer Express\CodeRush for VS
HKEY_CURRENT_USER\SOFTWARE\Wow6432Node\Developer Express\CodeRush for VS
HKEY_CLASSES_ROOT\CLSID\{7EB58660-96F1-49CF-B8AF-F47152B8CE29}
HKEY_LOCAL_MACHINE\SOFTWARE\Wow6432Node\Microsoft\VisualStudio\{VSVersion}\AddIns\CodeRush
HKEY_LOCAL_MACHINE\SOFTWARE\Wow6432Node\Software\Microsoft\Visual Studio\{VSVersion}\Addins\CodeRush
HKEY_CURRENT_USER\SOFTWARE\Wow6432Node\Software\Microsoft\Visual Studio\{VSVersion}\Addins\CodeRush
HKEY_LOCAL_MACHINE\SOFTWARE\Wow6432Node\Microsoft\VisualStudio\{VSVersion}\Packages\{13041012-50AF-4d13-A1E1-4978B21E49CD}
HKEY_LOCAL_MACHINE\SOFTWARE\Wow6432Node\Microsoft\VisualStudio\{VSVersion}\Packages\{BD359A86-BF88-4c4e-A7D2-6CDDA36C3B79}
HKEY_LOCAL_MACHINE\SOFTWARE\Wow6432Node\Microsoft\VisualStudio\{VSVersion}\Packages\{02BD4ECB-C032-4ced-B3C1-51AD29309225}
HKEY_LOCAL_MACHINE\SOFTWARE\Wow6432Node\Microsoft\VisualStudio\{VSVersion}\InstalledProducts\DXCore
HKEY_LOCAL_MACHINE\SOFTWARE\Wow6432Node\Microsoft\VisualStudio\{VSVersion}\InstalledProducts\Refactor!
HKEY_CLASSES_ROOT\Installer\UpgradeCodes\781A3E6ADAAEC45469EF271B371F91AF

5. Delete the DevExpressTools.Addin file from the following folders:

For Windows XP:

%AppData%\Microsoft\MsEnvShared\Addins

For Windows Vista, Windows 7 and up:

%ProgramData%\Microsoft\MSEnvShared\Addins

6. Navigate to the following folder:

%AppData%\Local\microsoft\VisualStudio\%VSVersion%\Extensions\

(replace the %VSVersion% in each of the Visual Studio versions you have installed)

Find the folders containing the “DevExpress.DXCore.MefComponents.dll” assembly and completely remove them.

Do the same (remove the entire folders containing the mentioned assemblies) in the following folder:

%Program Files%\Microsoft Visual Studio %VSVersion%\Common7\IDE\Extensions\DevExpress\

7. Download the latest version to make sure you are up-to-date and install it. Please visit DevExpress versions info page to learn about the most recent versions of our products.

—–
Products: all
Versions: all
VS IDEs: all
Updated: Aug/20/2012
ID: T015

Similar Posts:
How to install multiple IDE tools versions side-by-side

$
0
0

Different versions of IDE Tools can be installed together side-by-side on a single machine. Note, however, you can have only one version running at a given time.

There’s a DXCoreVersion tool which allows you to switch between installed IDE Tools versions any time. You can find the “DXCoreVersion.exe” tool in your bin folder which looks similar to this path:

“%Program Files%\DevExpress %YourVersion%\IDETools\System\DXCore\BIN”

For versions greater than v12.1, the path may look as follows:

“%Program Files%\CodeRush %YourVersion%\System\DXCore\BIN”

where %YourVersion% is a version of CodeRush (IDE Tools) you have installed.

Follow these steps to switch your tools version:

1. Close all the running instances of Visual Studio.
2. Go into the “CodeRush\System\DXCore\BIN” folder in the most recent install location. Actually, you could go to the folder for any of the installs, but it is recommended to choose to go to the most recent one just in case there’s been a fix or an addition to the version switch tool.
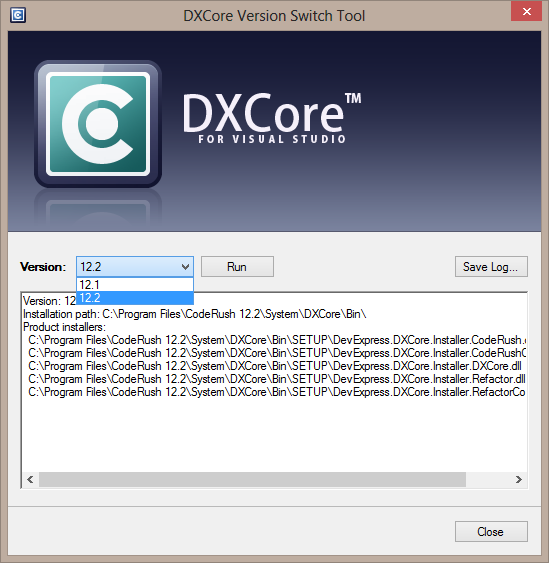
3. Run the DXCoreVersion.exe application:

4. The version selected in the dropdown box will be the latest version installed, not necessarily the active version. Select the IDE Tools version you’d like to be active and running, then click the “Run” button.

5. In the log window you’ll see that the version of IDE Tools currently set up will be unregistered and the version you selected will be registered (technically, this process doesn’t add or remove the installation from your system).

After the process is complete the message box will be shown with a message about your selected version. You may save the log pressing the “Save Log…” button in case your switch process wasn’t successful or you’d like to send the log to the DevExpress Support Services.  You can use this tool to switch from any installed version you have to any other version at any time. Also, it can be used for fast re-registering of a specific product version if you encounter product installation issues.

—–
Products: any
Versions: 12.1 and up
VS IDEs: any
Updated: Nov/29/2012
ID: T017

Similar Posts:

How to install/uninstall IDE tools in quiet/silent mode

$
0
0

IDE tools installation can be launched in silent (without GUI and no questions asked) mode. Here’s a sample command line:

IDETools-10.1.0.exe /Q /EMAIL:myaddress@company.com /CUSTOMERID:A1234 /PASSWORD:MYPASS /DEBUG

Available switches:

/Q – quite mode without GUI, no questions asked.
/INSTALLPATH:<path> – allows you to specify an installation directory instead of %ProgramFiles%\Developer Express .NET v10.1 used by default.
/EMAIL:email – email is your email address of your Client Center account.
/CUSTOMERID:id – id is your Security ID in the Client Center.
/PASSWORD:pwd  - “pwd” is your Client Center password (case-sensitive).
/DEBUG – forces the log file creation.

Available arguments:

-U – uninstall/remove mode

Sample:

IDETools-10.1.0.exe /Q -U

—–
Products: all
Versions: 9.1 and up
VS IDEs: any
Updated: Mar/11/2010
ID: T018

Similar Posts:

Installation – what’s with all .exe files for previous versions of IDE tools

$
0
0

You may notice that in your “Program Files\DevExpress…” folder, there’s an .exe file for each version of IDE tools you’ve installed, e.g.

IDETools-10.1.4.exe
IDETools-10.1.5.10101.exe
IDETools-10.1.5.exe
IDETools-10.1.6.exe

The following questions may raise:

  • Are all these really necessary?
  • Is there a reason that installing a new version doesn’t clear out the previous versions?
  • Can I safely remove them to clean-up my system?

So, the answer is that this is the specificity of DevExpress installation engine. Since they provide different installation packages (a separate IDE tools installer, DXperience installation, which contains controls only, the Universal installer, containing all products they provide) as well as provide the ability to install daily builds, DevExpress has to keep all installation files you run, in order to correctly update the products when installing an update (e.g. if you installed DXperienceUniveral v10.1.5, then install a daily build for the IDE tools, and then run the installation of the latest DXperienceUniveral daily build). So, they specifically do not delete previous installation executables. Probably, the current behavior is not optimal, but this is how their installation engine is currently supposed to work. This behavior isn’t peculiar to the IDE tools installation. However, if needed, you can delete these files, and leave only the latest installation only – it is absolutely safe.

—–
Products: all
Versions: 9.1 and up
VS IDEs: any
Updated: Sep/13/2010
ID: T028

Similar Posts:

How to install a particular DXCore plug-in

$
0
0

To install a particular DXCore plug-in you need to copy the plug-in dll into your plug-ins directory. Usually it looks similar to this path:

%userprofile%\Documents\DevExpress\IDE Tools\Community\PlugIns\

where “%userprofile%\Documents” is a path to the user Documents folder.

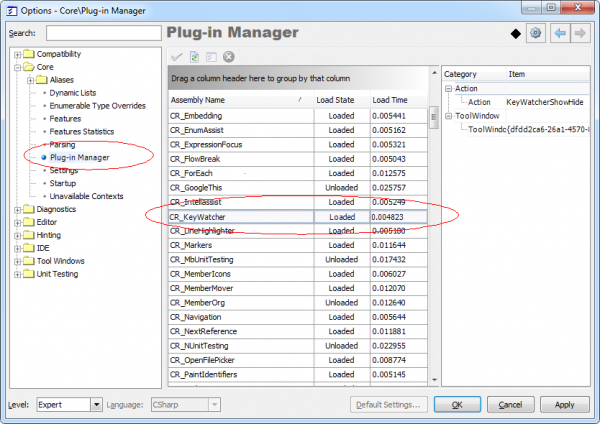
Once you copied the plug-in assembly, start Visual Studio and the plug-in will be loaded automatically by the DXCore. To see the overall list of plug-ins loaded you can use the Plug-In Manager options page inside the Options Dialog. Make sure that the plug-in you installed is listed in the Plug-In Manager and the state of the plug-in is “Loaded”. For example, if we install the KeyWatcher plug-in, it will appear in the list:

DXCore PlugIn Manager options page

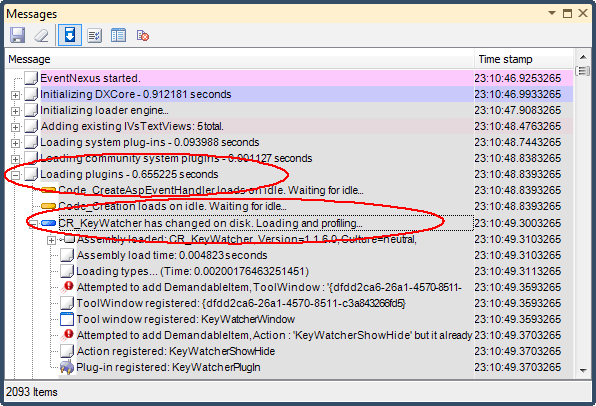
If you don’t see the installed plug-in in the list, the Messages diagnostic tool window may have some clues. To open it, go to the DevExpress | Tool Windows | Diagnostics | Messages menu item. Navigate to the top of all diagnostic messages, expand the “Loading plugins…” item, find the “CR_KeyWatcher” plug-in and see the details of its load to find any clues:

DXCore Messages window with CodeRush KeyWatcher

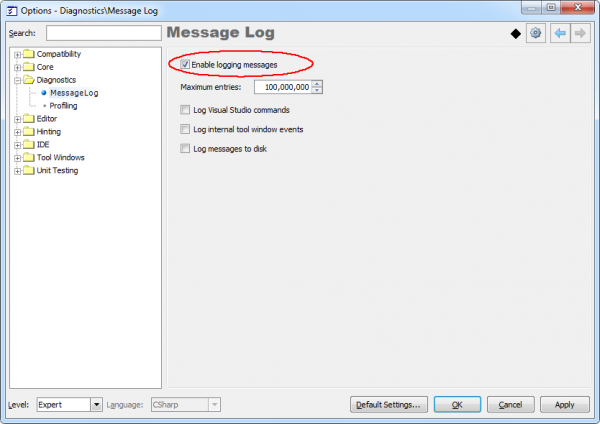
Note that the diagnostic messages are not logged by default, you have to manually enable the logging on the Diagnostics | Message Log options page:

DXCore MessagesLog options page

—–
Products: all
Versions: 10.2 and up
VS IDEs: any
Updated: Nov/29/2011
ID: T042

Similar Posts:

Deploying DXCore, CodeRush or community plug-ins using a VSIX extension

$
0
0

Note, this article has been moved to the official DevExpress Support Center site. Please refer to the moved article as it might have further updates or additional comments. Thank you.

A DXCore plug-in is usually represented by a single assembly. It might also include some additional data, for example, language dictionaries for the Spell Checker CodeRush plug-in and, probably, setting files, such as shortcuts. To install the plug-in, simply copy an assembly to the Community Plug-ins folder that looks like this in most cases:

%Documents%\DevExpress\IDE Tools\Community

where %Documents% is your Windows Documents folder.

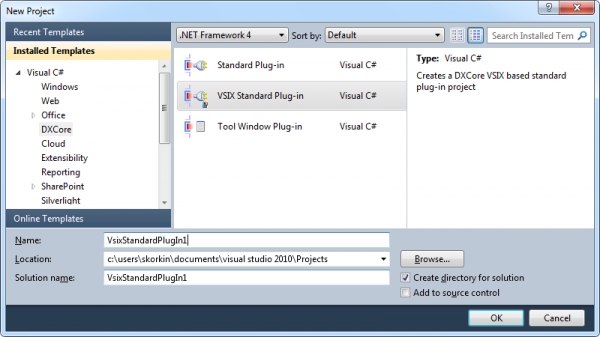
The community plug-in path is configurable and can be seen on the IDE Tools Settings options page. If a plug-in contains additional files, there should be some instructions on how to install it and where to copy those additional files. Starting with  the 11.2 release, IDE Tools include a special VSIX DXCore plug-in project template that allows you to create a usual DXCore plug-in and deploy it through an Extension to the Visual Studio IDE:

New DXCore VSIXStandardPlugIn project

Note that it is necessary to install the Visual Studio SDK to be able to create projects of this type.

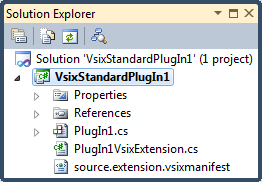
Here’s a project structure inside the Solution Explorer:

New DXCore VSIXStandardPlugIn project files

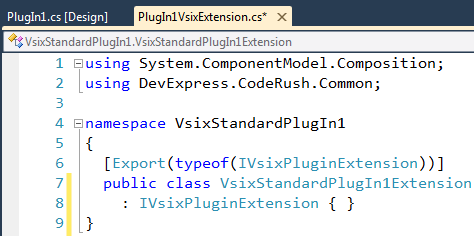
An extension references all assemblies required by DXCore and exports the IVsixPluginExtension implementer (from the DevExpress.CodeRush.Common assembly):

DXCore VSIXPlugInExtention implementer

Then, DXCore imports all implementers and uses their assemblies as a location to load additional plug-ins. The VSIX extension may contain multiple plug-in assemblies that will be automatically loaded by DXCore when found.

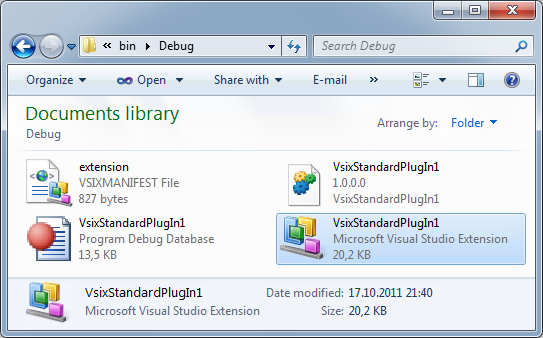
Once the plug-in is successfully compiled, you will notice a regular VSIX Extension file created inside the output folder of the plug-in solution:

DXCore VsixStandardPlugIn extension file

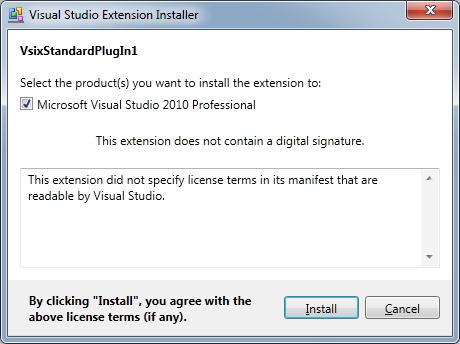
If you execute it, you will see the standard Visual Studio Extension Installer dialog:

DXCore VsixStandardPlugIn installer

If you click Install, the installer will unpack the content of the plug-in to the following folder:

%AppData%\Microsoft\VisualStudio\10.0\Extensions

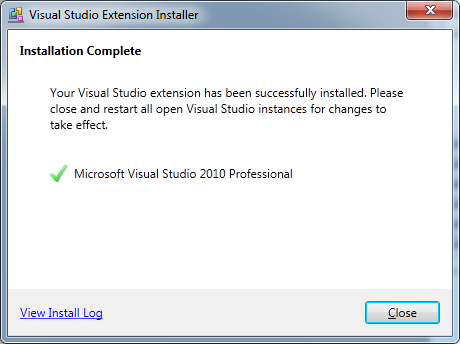
and show the result of an installation:

DXCore VsixStandardPlugIn installation complete

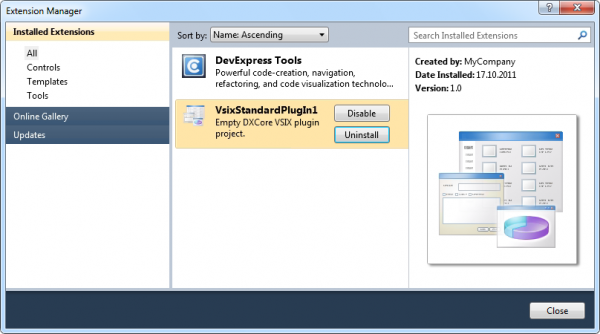
Once the plug-in is installed, you will see it inside the Visual Studio Extension Manager:

DXCore VsixStandardPlugIn Extension Manager

You can disable any plug-in extension or completely uninstall it inside the Extension Manager by clicking the corresponding buttons.

—–
Products: all
Versions: 11.2 and up
VS IDEs: any
Updated: Oct/31/2012
ID: T052

Similar Posts:

CodeRush/IDE Tools system requirements

$
0
0

This is another frequent question from new CodeRush users, which is not exactly specified anywhere yet because CodeRush does not really rely on hardware or software requirements – it should run OK everywhere your Visual Studio is installed.

Supported Operating Systems

CodeRush supports any operating system no matter whether it is 32 or 64 bits with Visual Studio installed.

Supported Visual Studio versions

The latest version of CodeRush supports Visual Studio versions starting from 2008. You can request previous product versions that work with earlier versions of Visual Studio from the DevExpress Support Team.

Visual Studio Express editions are not supported, because these versions do not support extensibility.

However, it is recommended that your Visual Studio has all latest service packs installed.

Hardware requirements

CodeRush does not require a lot of memory installed on your computer and does not need a high-speed processor. The following blog post from Mark Miller may better describe the CodeRush system impact in regard to memory and performance consumption:

Performance and Memory Milestones in CodeRush and Refactor! Pro

—–
Products: all
Versions: 11.2 and up
VS IDEs: 2008 and up
Updated: May/30/2012
ID: T057

Similar Posts: